The following steps will show how to create a trigger. The steps may seem a bit backward, however, they will save you time and headaches if followed properly. The first and most important step is to create a schematic of the trigger process. Second, you will create all of your cards. You will then create the connection(s) to be used. Finally, you will create your trigger(s).
Create a Schematic

Create a Card to trigger other Cards
You will need to create your Cards first so they are ready to choose when creating your Triggers. There are certain Card Types that allow specific triggers. For more information on the trigger types, read the Different Trigger Types article.
Card Types and the Triggers they allow
- Content Card: Button Pressed.
- Video Card: Finished Video, Button Pressed.
- Embedded File Card: Button Pressed.
- Question Card: Answered question in a Question Card, Button Pressed.
- This or That: Answered all questions in a This or That card.
- Feedback Card: Button Pressed.
- Order Up Card: Button Pressed.
- Likert Card: Answered Likert question, Button Pressed.
There are two more trigger types, however, they are not at the Card level. One is based solely on a connection and the other is at the Deck level.
Other Trigger Types
- All assessments complete: Just add the connection that is on all of the assessments.
- Finished all videos in a deck: Provide the Deck that contains the videos.
Create your Trigger Connection
Once your Cards are created, you will then need to make the connection the trigger will use.
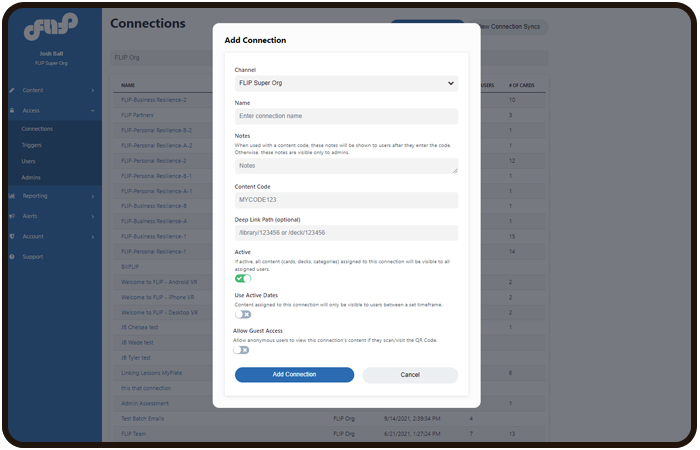
Locate and expand the Access section in the main left navigation. Click on the Connections section. This will bring up the main connection list page. On that page, click on the button in the top right of the screen titled Create Connection.

Clicking this will bring up the create connection modal. You will want to name your connection something very specific, relating to the trigger. The best practice is to put the name of the trigger first, then the word connection, i.e., Launch card connection. You can ignore the Content Code option since this is a trigger connection and will not be able to be shared. You can also ignore the Deep Link Path option since this is a trigger connection and will not be able to be shared. Make sure the active state is toggled on.
Creating your Trigger
Now that you have created your Cards and have the connections ready, you can create your triggers.
Locate and expand the Access section in the main left navigation. Then, click on the Triggers section. This will bring up the main trigger list page (this may be empty if you are just starting). Click on the button in the top right of the screen titled Create Trigger.

This will take you to the trigger creation screen. You will be able to customize your trigger and choose the type that fits your needs. Please read the Different Trigger Types article for more information.
You will want to title your Trigger with something specific. This should have been done on the schematic. Then you will choose how you would like the Trigger to work or what type of Trigger you will want to use. The next option is to decide if you will be adding a connection or removing a connection. Essentially, providing more Cards, or removing existing Cards. Finally, select the connection and click Create.
Now that the trigger is created, make sure to go back to the Deck of Cards you created first. Locate the Cards you want to be triggered and add the "trigger" connection to them.
If you chose a "Button Pressed" Trigger, locate the Card that will have the Trigger button on it and click the bullseye icon from the WYSIWYG.
This will bring up options for the button. You will need to add button text the user will see, and then select the Trigger the button will use.
You should now be set to test your triggers from the app side.
Was this article helpful?
That’s Great!
Thank you for your feedback
Sorry! We couldn't be helpful
Thank you for your feedback
Feedback sent
We appreciate your effort and will try to fix the article